Skid Software launch and my Presentation at India International Centre(IIC),New Delhi

On 10 October 2008, Skid software was officially launched at the India International Centre, New Delhi, India. In this launch Dr.Arun Mehta told people about the problems with which an Autistic child suffers from and also about the inaction on the government’s part.

All the people who had gathered there were shown the video of Arpit (whose blog is in my blogroll),an Autistic child, using the Skid software with the help of a gaming wheel. You can see the video below

You can see Arpit using the gaming wheel in the above video.

Arpit was also there at the function.

I was also given a chance to demo my cropping and picedit modules at IIC, main hall . First, I gave demo of my crop module and showed them by cropping a picture . Next I demonstrated the picedit module and as soon as people saw the border being added to the picture i realised  they understood the whole working as there were reactions from the audience.

One autistic girl from the audience came up the stage and tried her hand at the Skid software. The girl did some typing with the help of the gaming wheel and looked very excited and happy with the software.

All in all it was a great learning experience as it was the largest gathering in front of whom I have given a presentation and also an honour to speak at the India International Centre, Main Hall .

Anmol Anand : Web Designer

In my last post I had written code for cropping an image using Ruby and Rmagick and I had mentioned that I was working upon a simple picture editor for Skid software, which is a software(web site) designed for people with Autism,cerebral palsy, dyslexia or anyone who has a problem with keyboard or mouse. .

I have not written any post on my blog for quite some time now, as I was waiting for something significant to happen so that I can talk about it. So, I have completed my share of work for Skid software and developed two modules, instead of one, which was planned earlier.

My first module is “Crop module” which was developed in the Expert Guidance of Prof. Arun Mehta. The crop module allows you to have some fun with pictures, It allows you to crop a picture from all sides i.e. ‘left’,’right’,’top’ and ‘bottom’. The crop module works in conjunction with picbrowser module. First, you have to select a picture from the picbrowser module and then move to the crop module. On moving to the crop module, first select the side from where you want to crop the picture i.e. ‘left’,’right’,’top’ and ‘bottom’ and by the help of up and down arrow buttons increase or decrease the amount of cropping. After doing the desired cropping, save the picture by clicking the smiley and your picture will be saved in the relevant directory.

There is a special way in which we save the names of the files that are cropped and finalised by the users.For example:

If you select a picture of ‘Football.jpg’ and then you go to the crop module and perform 40% cropping from right and save it, the name of the new cropped file will be ‘Footballcr40‘.jpg, meaning Football.jpg croped 40% from right. Each time you perform a new operation on a picture, it’s abbreviation is appended to the name of the orignal file and saved.

left crop – cl

right crop – cr

top crop – ct

bottom crop – cb

A picture of crop moule on www.skid.org.in

A picture of crop moule on http://www.skid.org.in

Above picture cropped 60% from left with help of crop module

Above picture cropped 60% from left with help of crop module

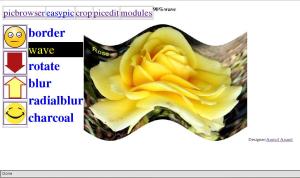
Now, let me talk about the second module which was made independently by me, after Prof Arun Mehta taught me how to go about the process, during making of crop module. This module is the ‘picedit’ module. This module lets you to have even more fun with pictures by allowing you to add effects such as border, wave, blur, radialblur, rotate and charcoal effect to the picture you have selected. The methodology is the same, first go to picbrowser, select the picture on which you want to add picture effects. Once you have selected the picture, move on to the picedit module and select the effect which you want to add to the picture. Once you have selected the effect, increase or decrease the amount of effect with the help of up and down buttons on the left side of the page. When you are done with your work, save the picture by pressing the select button.

Again, there is a special way in which we save the name of the files that are cropped and finalised by the users. For example: If you select the picture of ‘Football.jpg’ and then you go to picedit module and add a border of 40 pixels to the image and save it, the name of the new file will be ‘Footballb40.jpg’ meaning Football.jpg has been added with 40 pixel border. Each time you perform a new operation on a picture, it’s abbreviation is appended to the name of the orignal file and saved.

border – b

wave – w

rotate – rot

blur – bl

radialblur – rdb

charcoal – co

picedit module showing wave effect in the flower image

picedit module showing wave effect in the flower image

You can go and try the software on http://www.skid.org.in and apart from this module there are wikipedia module, email module etc.

I would like to thank God and my Parents who have helped me and supported me throughout the period of making of these modules and also given me strength when my spirits were down.

Once again I would like to thank Prof Arun Mehta for giving me a chance and making me part of this noble mission to help Autistic Children and also giving me guidance and support throughout the period of making these modules and also when I was struck with errors in the program .

Thank you all !!!!

Crop an Image using Ruby and Rmagick

#!/usr/local/bin/ruby -w
require ‘RMagick’
include Magick

puts “Please enter the path of the file for which you want to perform cropping(complete path with file extension) :: \n ”
path=gets #gets the path from the user

puts “The file path specified by you is as follows :: \n ”
puts path.inspect #prints the user given path on the scrreen

path = path.chomp #this command helps remove the newline in the end of path to make it executable for Image.read()
img = Magick::Image.read(path).first #reads the image specfied by the user path

thumb = img.scale(640,480) #scales image to 640×480

puts ” Please choose the option
1 = Crop from left
2 = Crop from right
3 = Crop from top
4 = Crop from bottom ”

choice = gets #gets the user choice of cropping
choice=choice.to_i #converts the choice to integer by to_i so that it can be used in following case statement

puts “please specify the percentage that has to be cropped ”
percentcrop = gets #gets the percentage that has to be cropped from left,right,top,bottom choosen by user
percentcrop = percentcrop.to_i #converts the user entered percentage to integer
percent = percentcrop/100.0 #divides it by 100 so that it can be used for specifing new width and height of the pic

width = 640 ; #width of the pic (in pixels)
height = 480; #height of the pic (pixels)

widthchanged = (width*percent) #new width (based on the percentage specified by the user)
#widthchanged =widthchanged.to_i

heightchanged = (height*percent) #new height (based on the percentage of cropping specified by the user)
#heightchanged = heightchanged.to_i

case choice
when 1
final=thumb.crop(NorthWestGravity,widthchanged,height).write”/home/anmol/blogimage.jpg” #writes the cropped image into a file
final.display #displays the final cropped image
when 2
final=thumb.crop(NorthEastGravity,widthchanged,height).write”/home/anmol/blogimage.jpg” #writes the cropped image into a file
final.display #displays the final cropped image
when 3
final=thumb.crop(NorthWestGravity,width,heightchanged).write”/home/anmol/blogimage.jpg” #writes the cropped image into a file
final.display #displays the final cropped image
when 4
final=thumb.crop(SouthEastGravity,width,heightchanged).write”/home/anmol/blogimage.jpg” #writes the cropped image into a file
final.display #displays the final cropped image
else
puts “No cropping is performed”
final=thumb.write”/home/anmol/blogimage.jpg” #writes the cropped image into a file
final.display #displays the final cropped image
end

This program is the refined version of the previous crop program that I wrote . This program is basically performing cropping on a file specified by the user from four sides left,right,top and bottom according to the percentage specified by the user .

Now I am working on incorporating this program into skid website as a crop module using Ruby on Rails(RoR) . So below are some pictures which show how user can use this program to crop a desired picture.

the starting image

the starting image

cropped from left 60%

cropped from right 60%

cropped from right 60%

cropped from left 60%

cropped from top 66%

cropped from bottom 66%

cropped from bottom 66 %

cropped from top 66 %

Ruby and Rails Tutorials

I am giving url of sites that are either books , tutorials or simply a help in form of video , audio and refcards to learn Ruby and Rails.

Ruby :

Online Guide : The Pragmatic Programmers Guide (Picaxe Guide)

Site-point

Book : The Ruby Cookbook

Ruby Learning through flashcards : YoYoBrain

Online Tutorial : Meshplex Tutorial

Rails : In this section I have been able to find video tutorials only .

Video tutorial : Learning Rails

Video Tutorial : Railscasts

PS : I will try to update the list if I am able to find other good tutorials . Otherwise , there are very good books available in the market which help the cause of learning ruby and rails and I will try to name a few which I know in one of my following posts

Enjoy Learning !!! 😀

Ruby program to scale and crop an Image using Rmagick


#!/usr/local/bin/ruby -w
require ‘RMagick’
include Magick

img = Magick::Image.read(‘/home/anmol/jack.jpg’).first # path of Orignal image that has to be worked upon
puts img.inspect

def try(x,y,width,height)


# converting x,y , width and height to integer values in next four statements
x= x.to_i
y= y.to_i
width= width.to_i
height= height.to_i

# Demonstrate the Image#crop method
@st = ‘/home/anmol/tempimage.jpg’ # path of image written after changing size or not changing also
img = Magick::Image.read(@st)[0]

# Crop the specified rectangle out of the img.
chopped = img.crop(x, y, width,height)

# Go back to the original and highlight the area
# corresponding to the retained rectangle.
rect = Magick::Draw.new
rect.stroke(‘transparent’)
rect.fill(‘black’)
rect.fill_opacity(1.0)
rect.rectangle(x, y, 100+x, 10+y)
rect.draw(img)

img.write(‘/home/anmol/imgbeforecrop.jpg’) #path of image written before cropping

# Create a image to use as a background for
# the “after” image.
bg = Magick::Image.new(img.columns, img.rows)

# Composite the the “after” (chopped) image on the background
bg = bg.composite(chopped, 38,81, Magick::OverCompositeOp)

bg.write(‘/home/anmol/imgaftercrop.jpg’) # path of image written after cropping the desired part

exit

end

puts “Please enter ::
1 = Making image one-fourth of it’s orignal size
2 = Making image half of it’s orignal size
3 = Making image three-fourth of it’s orignal size
4 = Minfing the image
5 = Magnfing the image \n”

print “option selected = ” ; option = gets
option = option.to_i

puts “Please enter x co=ordinate , y co-ordinate , width and height from x and y co-ordinates of the portion that is to be cropped [ALL THE FOUR VALUES TO BE NUMERIC VALUES AND GREATER THAN ZERO] “

print “x co-ordinate ” ; xc= gets ;
print “y co-ordinate ” ; yc= gets ;
print “width ” ; w= gets ;
print “height ” ; h= gets ;

case option
when 1
thumb = img.scale(0.25) #scale image to 25 % of it’s orignal size
thumb.write “/home/anmol/tempimage.jpg”
# path of image written after changing size or not changing also
puts thumb.inspect
try(xc,yc,w,h)

when 2
thumb = img.scale(0.50) #scale image to 50 % of it’s orignal size
thumb.write “/home/anmol/tempimage.jpg”
# path of image written after changing size or not changing also
puts thumb.inspect
try(xc,yc,w,h)

when 3
thumb = img.scale(0.75) #scale image to 75 % of it’s orignal size
thumb.write “/home/anmol/tempimage.jpg”
# path of image written after changing size or not changing also
puts thumb.inspect
try(xc,yc,w,h)

when 4
thumb = img.minify # minify the image
thumb.write “/home/anmol/tempimage.jpg”
# path of image written after changing size or not changing also
puts thumb.inspect
try(xc,yc,w,h)

when 5
thumb = img.magnify #magnify the image
thumb.write “/home/anmol/tempimage.jpg”
# path of image written after changing size or not changing also
try(xc,yc,w,h)

else
puts “the image will remain in it’s orignal size ”
thumb = img
thumb.write “/home/anmol/tempimage.jpg” # path of image written after changing size or not changing also
try(xc,yc,w,h)

end

I said in the last post that I am working on Simple Picture editor for Skid software , So I have posted a liitle bit of code which I have written in Ruby , it’s a small step and a lot has to be done .

This program first asks user weather he/she wants to change the size of the image to one-fourth of it’s orignal size , minify it , magnify it etc . After you specify the size , user is asked about the dimension of the rectangle which is to be cropped from the image . After specifing the rectangle dimension , the image cropped image is written .The program produces 3 images , first image is tempimage.jpg which is created if user agrees to change the size of the image ; second image is imgbeforecrop.jpg which specifies the rectanglular portion in the image which will cropped by blackening that particular portion of the image ; third image is the imgaftercrop.jpg which has only the cropped portion of the image.

This program is not complete yet and lot of work has to be done on it . First thing which I want to do is to incorporate a graph or grid with the picture so that it becomes easier for the user to specify the crop portion otherwise it is a relatively tough task to do .

Other thing is that I want to get the path of the image file from User , but somehow Image.read function doesn’t take User input , so I will try find some other way .

I will subsequently post the newer versions of the program , as soon as I do some work on it that is worth mentioning 😀

PS:: Please don’t forget to change the path of the image , the path of thumb.write (in case statement) and path of @st in try function should match .

Please Install Rmagick and Ruby prior to run the program .

This program was run on Linux and for Windows commands can be slightly different .

Web Programming Lecture in Second Life

On 10 August 2008 , I ,Anmolanand Inshan*, got an oppertunity to attend a Live lecture on Web Programming through Ruby and Ruby on Rails in my Second Life . The lecture was delivered by Professor Arun Nighfire* (Arun Mehta) at the Kaosome hub . Apart from me other people who attended the lecture were Al Supercharge* , Freemason Magic* and Pechkin Lavochkin*. Both Al and Freemason were familiar with web programming , Al knows PHP and Freemason knows LSL i.e Linden Scripting Language . Pechkin Lavochkin is a SOMA Intern and Site Manager.

Basically , Professor Mehta told us about the beauty and simplicity of Ruby and Ruby on Rails . He also showed us his framework Skid (Special Kid) which has been designed for Special children(example : those with Cerebral Palasy , Autism etc ) to help them to communicate easily and help them to come into the mainframe of the life .

One of the things which I noticed when I was hearing to the lecture was that there was an amplification in the voice when I went towards Professor Mehta .

So , this lecture was aimed to give an Insight into Ruby , RoR and Skid , so that people can learn Ruby and RoR and also help in making new modules for Skid , if they want .

I am making a module which will help children with simple Picture editing . 🙂

The next lecture is scheduled for 17 August 2008 , 2230 hrs by IST and round about 10 am by Second life time . You can check the Second Life Events for correct timings and Venue as there can be a change .

To know more about Second Life , click here

* Names in Second Life

Installing Rmagick on Hardy Heron Kde4 Remix

I wanted to learn Rmagick and so the first step was to install Rmagick , so that I can use it in my Ruby applications and work with images too .

I found many solutions to install Rmagick on linux but after trying them out , I found out that Rmagick is not installed properly and I am not able to work with it .

Installing Rmagick can take near to 1 hour and therfore please be patient and let the system do whatever it is installing when Once the command has been given .

Installing Rmagick takes time and it is not so easy , as I found out 😀 .

So , below is the link which I followed to install Rmagick on my notebook

http://rmagick.rubyforge.org/install-linux.html

Most systems have tools specified in Step 0 and Step 1 already installed , so please check your system , so that you don’t install the preinstalled tools .

After confirming that you have the tools preinstalled , you can proceed with Step 2 and Step 3

In Step2 , I have installed ImageMagick and to know how to install ImageMagick on linux , go to http://www.imagemagick.org/script/install-source.php and follow the instructions under ” Install from

Unix Source “.

After successfully installing ImageMagick , return to http://rmagick.rubyforge.org/install-linux.html

and follow the Step 3 to install the Rmagick gem .

When you are successfully done with Rmagick installation , then write the command ‘locate rmagick‘ in the konsole and check the directory where Rmagick is installed , as this directory path can be very helpful for for future use .

I think , my post will help you in the installation of Rmagick and if this post doesn’t help you in successful installation of Rmagick then you can try other blogs and sources as well , because sometimes different distributions of linux need different steps to install cartain tools 🙂

Installing MySQL Server on Linux (Ubuntu and Kubuntu) for Ruby and Rails

I have installed MySQL on my Hardy Heron KDE4 remix after repeated efforts and that is why I thought that I should list the steps showing how to go about the task.

First of all open the terminal/konsole and type there “sudo apt-get install mysql-server ” and then press enter. You will be asked for your password and after providing password the installation will begin . In this you will also have to set up your MySQL password , so that your database remains secure .

Post installation type ” mysql -u root -p ” , you will be asked for your mysql password and after providing password , You should see the following :

Welcome to the MySQL monitor. Commands end with ; or \g.
Your MySQL connection id is 11
Server version: 5.0.51a-3ubuntu5.1 (Ubuntu)

Type ‘help;’ or ‘\h’ for help. Type ‘\c’ to clear the buffer.

mysql>

If you see the above lines ,it means you can now work on MySQL, as far as i have understood this .

Installing MySql driver :

In konsole type “apt-cache search libmysqlclient ” to find out the different library versions available.You will see text similar to the following :

libcrypt-mysql-perl – Perl module to emulate the MySQL PASSWORD() function.
ser-mysql-module – contains the MySQL database connectivity module
libmysqlclient15-dev – MySQL database development files
libmysqlclient15off – MySQL database client library

Next install the library by typing ” sudo apt-get install libmysqlclient15-dev ” on the konsole . Library will depend on the version of MySQL you are using , you can select your library from the output which comes after writing  “apt-cache search libmysqlclient” and then pressing tab two times .

Install MySQL driver with the Ruby ” gem install ” command . Type ” sudo gem install mysql ” on the konsole , here you will get various options choose “mysql-2.7” or any other latest version and install it . On successful install you will get a message stating that mysql-2.7 has been Successfully installed .

Your Installation of mysql is complete .

If you are new to MySQL , like me , you can install MySQL Query Browser and MySQL Administrator from the Adept Manager or Synaptic both of which are default package managers for kubuntu and ubuntu respectively. I have installed Query Browser and Administrator from Adept Manager as I am a Kubuntu user .

Sudoku Solver by MATZ

I have started learning RUBY programming language and I bought a book “The Ruby Programming Language ” written by David Flanagan and Yukihiro Matsumoto (Developer of Ruby programming Language and fondly called MATZ ) .

In the first chapter there is a “Sudoku solver” written by MATZ and it is one of the most Beautiful Code I have ever seen . The Sudoku program is the most Beautiful Code because it is documented very beautifully and you can understand the code with the help of documentation , if you have read all the topics preceding Sudoku program in the first chapter ; other beautiful thing about the code is the intelligence with which Matz solves the problem and finds out all unknown values in the Sudoku puzzle . The use of iterators has also been done very cleverly and since Iterators were new to me so I enjoyed learning them from code written by Matz.

The code by MATZ helps to learn intelligent programming and brings us face to face with the simple yet powerful Ruby programming language and for an amature programmer like me it was a great learning experience!!!

You can download the Sudoku program and also some other examples present in the book from O’Reilly site whose link is http://examples.oreilly.com/9780596516178/

The details and reviews regarding the book are at http://oreilly.com/catalog/9780596516178/